50 Video Editing Tips for Beginners & Pros (2026)
50 actionable video editing tips for YouTube Shorts, TikTok, and Instagram Reels. Covers short-form pacing, audio, pro techniques, AI workflows, and free tools.
FlowShorts Team
Whether you're cutting your first YouTube Short or polishing a client project, video editing tips boil down to one thing: keep people watching. The techniques are the same whether you edit on a phone or a $5,000 workstation — tight pacing, clean audio, and intentional cuts.
These 50 tips cover short-form video editing, beginner fundamentals, audio, pro techniques, and AI-powered workflows. Every tip is something you can apply to your next video today.
Short-Form Video Editing Tips (Tips 1–10)
Short-form content — YouTube Shorts, TikTok, Instagram Reels — lives and dies by the first few seconds. These editing tips for YouTube Shorts and TikTok apply to every vertical video platform.
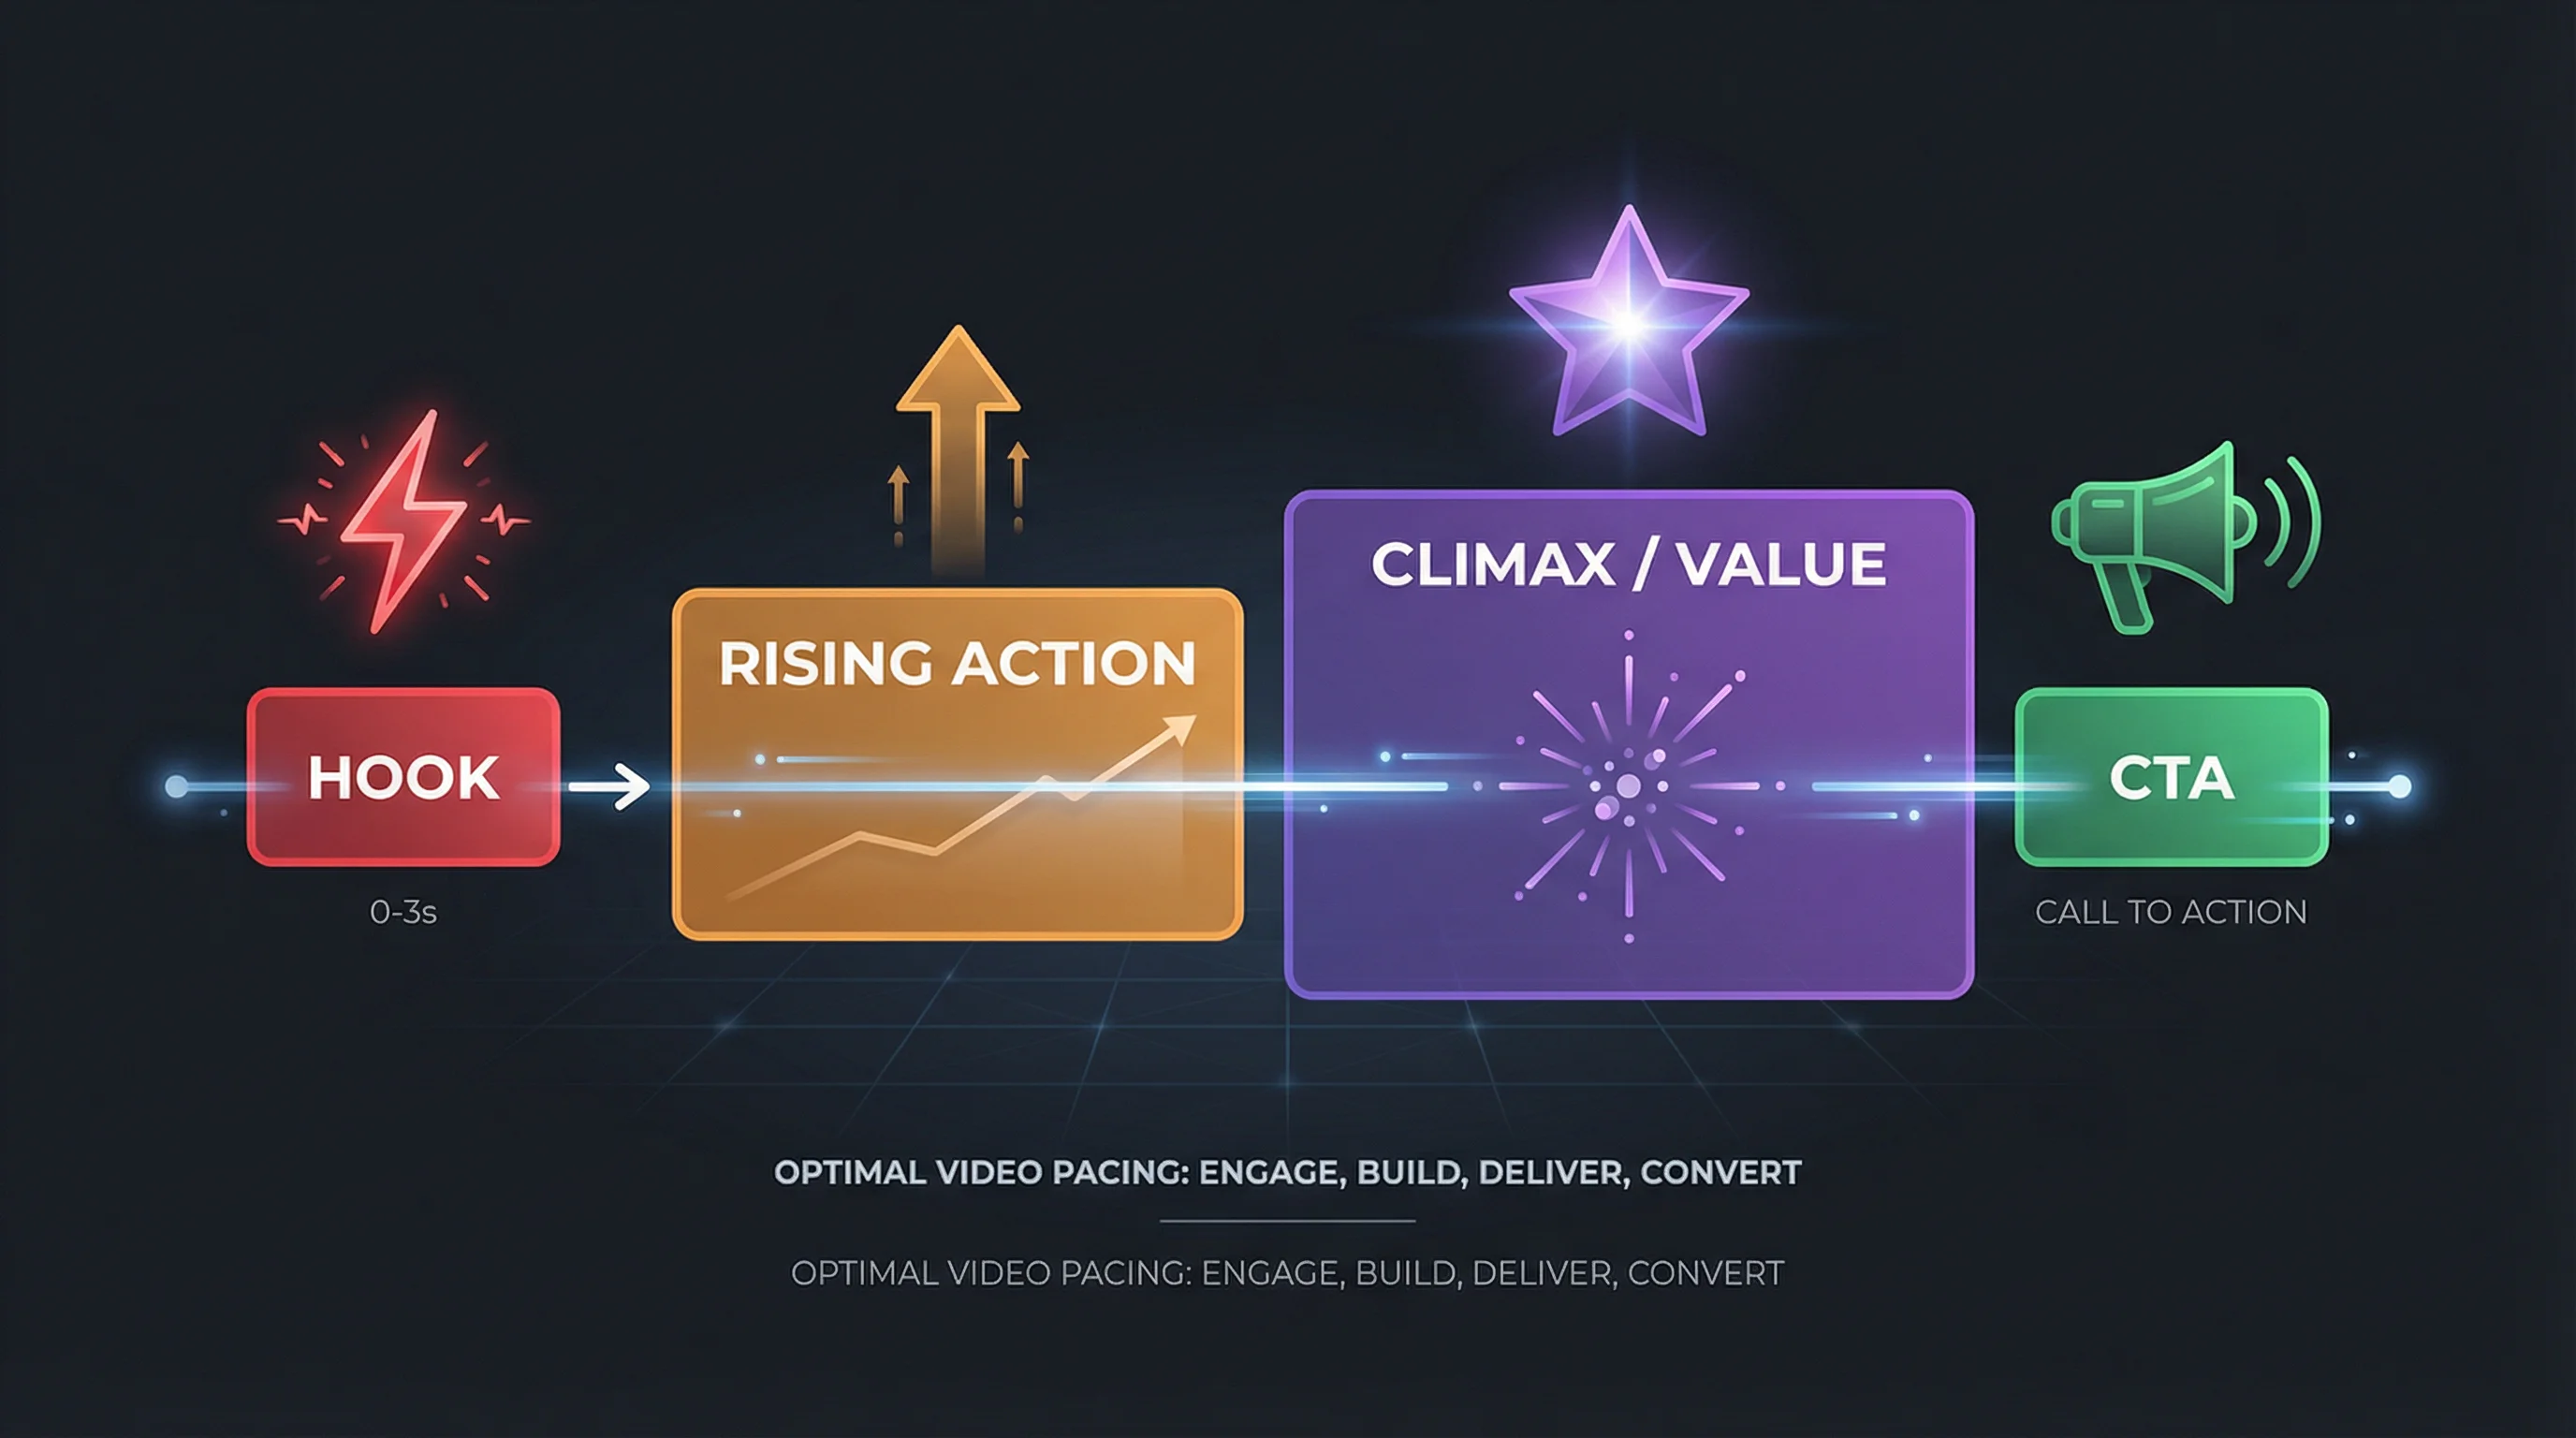
1. Hook Viewers in the First Second
You have one second before the thumb swipes. Start with the most interesting, surprising, or visually striking frame in your entire video. Don't build up to it — lead with it.
Effective hooks include: a bold claim ("This one trick doubled my views"), a visual pattern interrupt (unexpected zoom or motion), or showing the result before the process. Our free video hook generator creates scroll-stopping openers you can adapt for any niche.
2. Keep On-Screen Text Under 3 Seconds
Text that lingers too long feels like a slideshow. Text that flashes too fast is invisible noise. The sweet spot is 1.5 to 3 seconds per text element, depending on word count. Rule of thumb: 1 second per 3 words, minimum 1.5 seconds for any element.
If the text is critical (a stat, a key name, a CTA), hold it slightly longer. If it's reinforcing what the narrator already said, keep it brief.
3. Use Trending Audio and Sounds
TikTok and Instagram Reels prioritize videos using trending audio. Even if the sound is just background music at low volume, using a trending track gives your video algorithmic lift. Check TikTok's Creative Center or Instagram's audio library for what's trending this week.
For voiceover content, layer trending instrumental audio behind your narration. The algorithm picks up the audio association, and your voiceover carries the actual message.
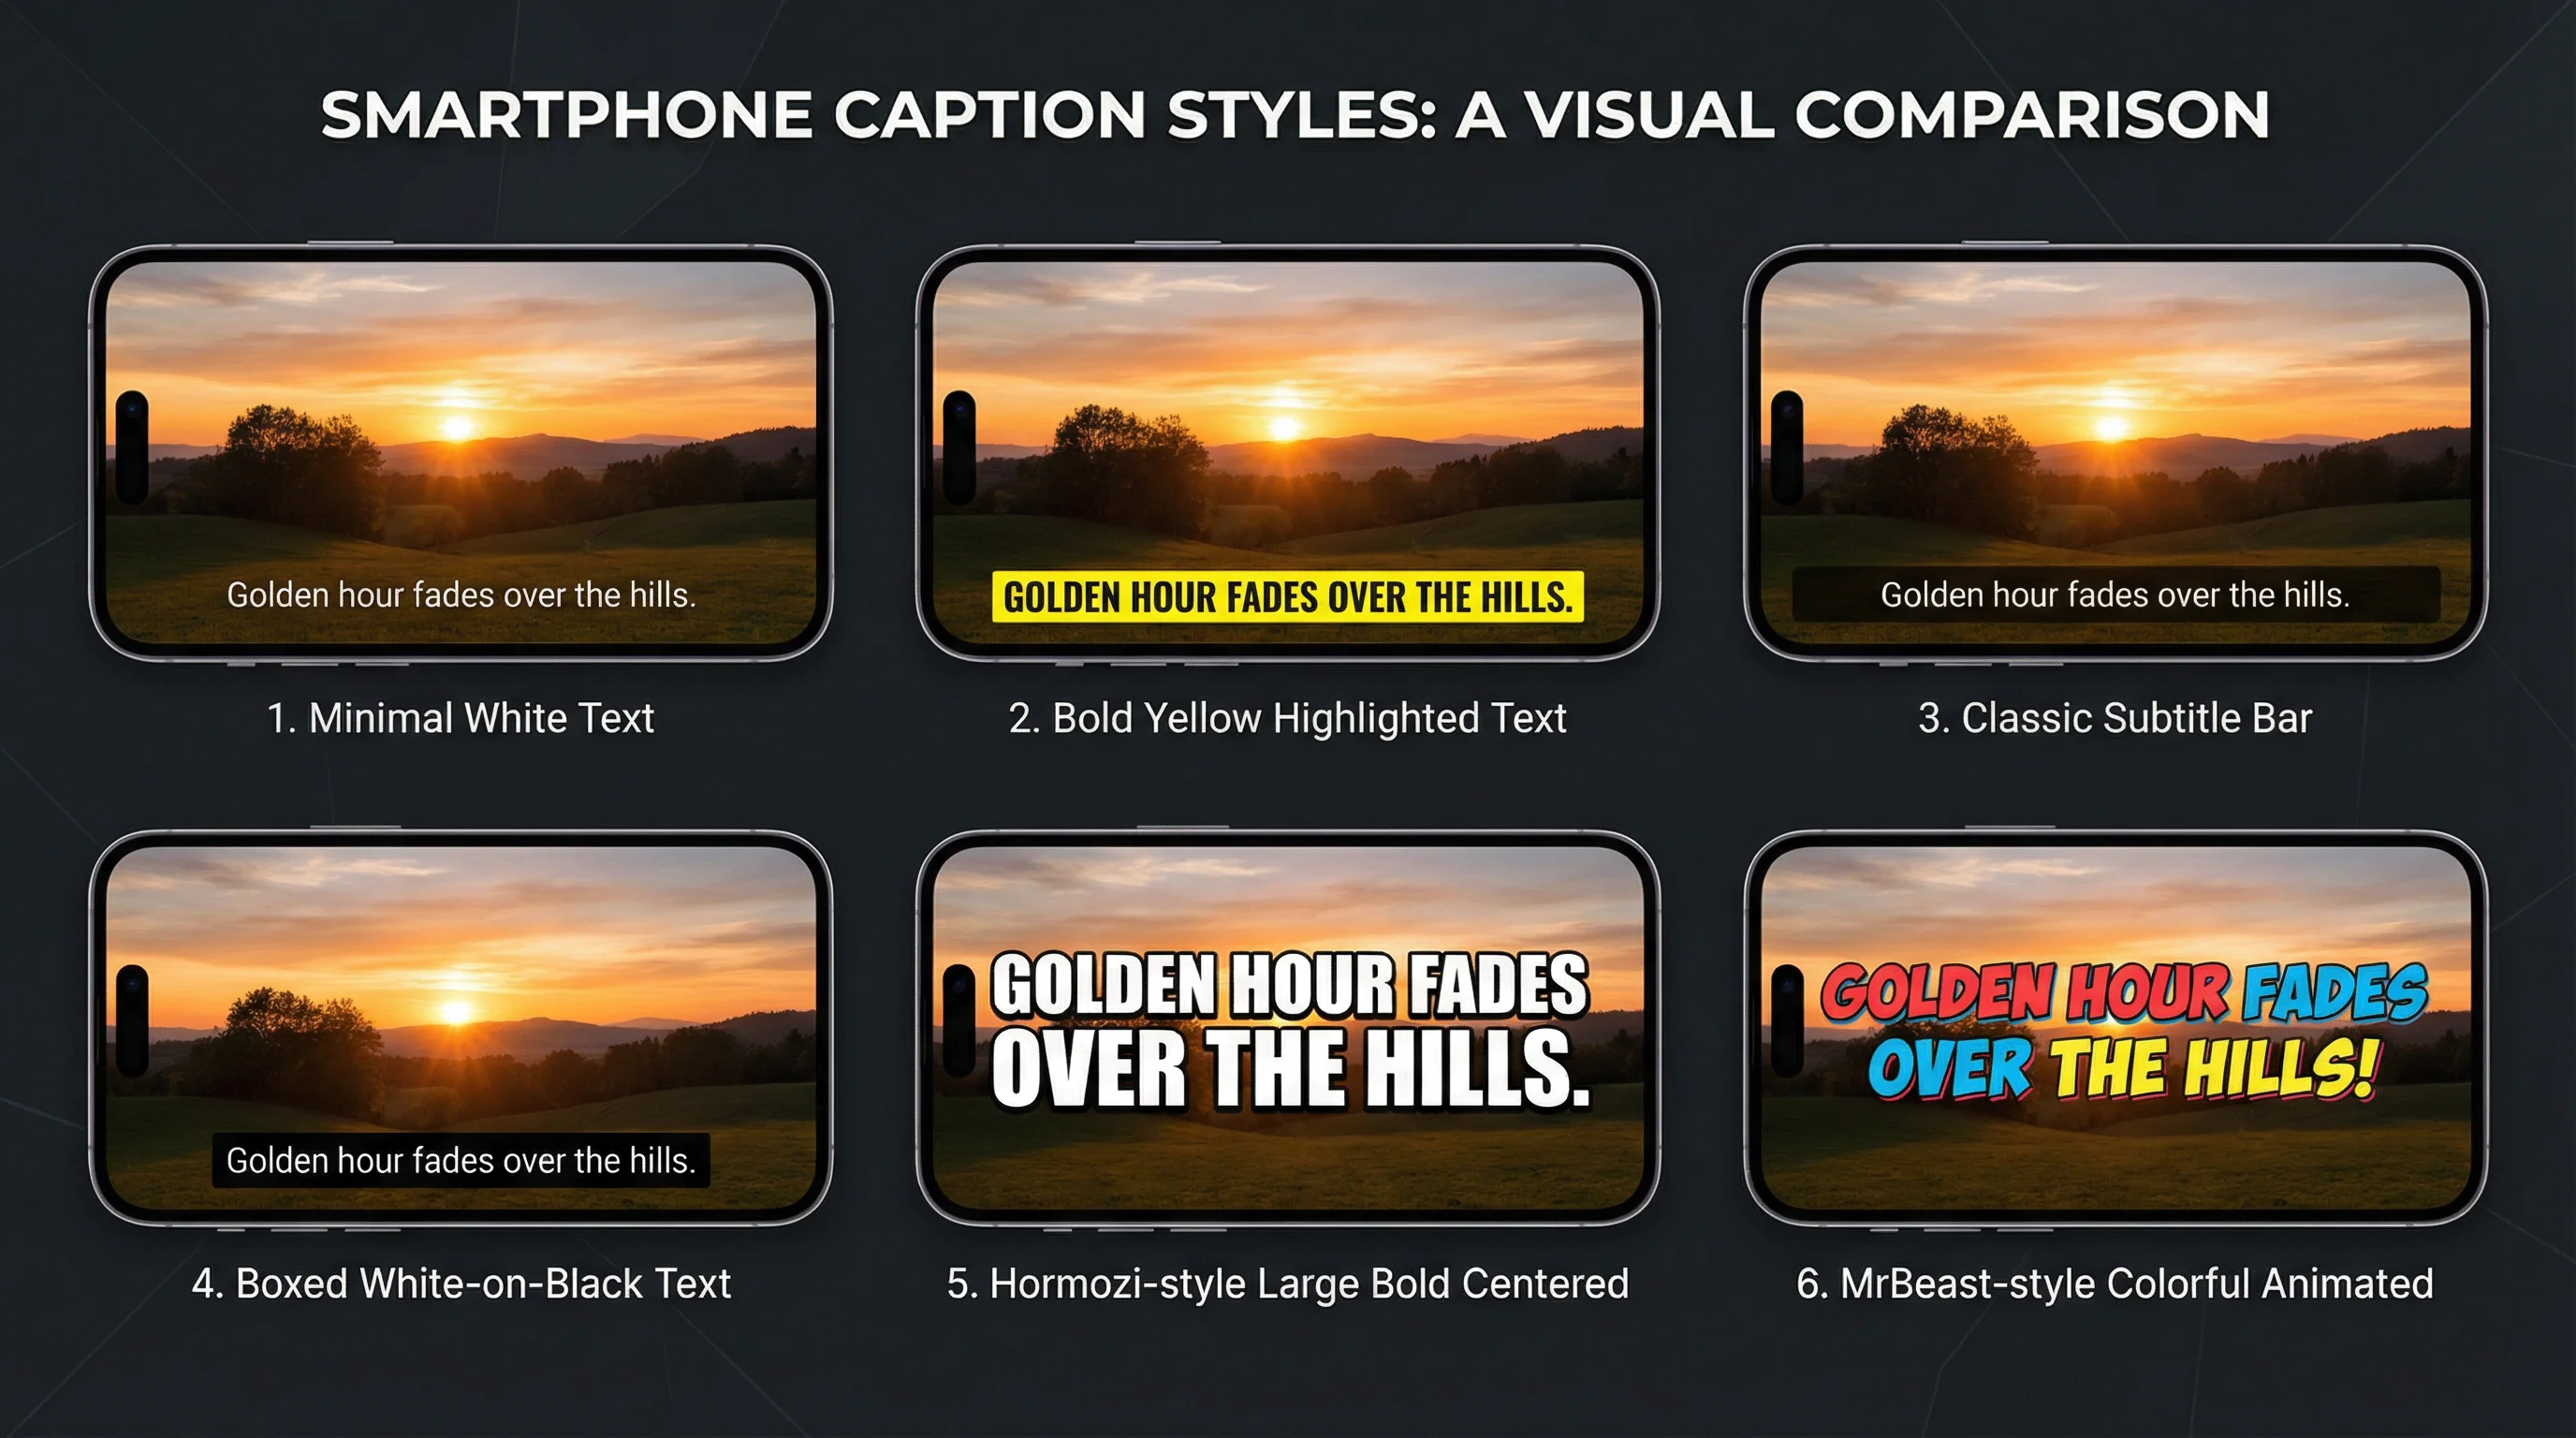
4. Add Captions — 85% Watch Without Sound
According to Kapwing's state of video report, 85% of social media video is consumed on mute. Captions aren't a nice-to-have — they're required for reach.
Use word-by-word animated captions (the TikTok style where each word highlights as it's spoken) for maximum engagement. Large text, high contrast, center-lower positioning.
5. Shoot and Edit in Vertical 9:16 — Always
Horizontal content cropped to vertical always looks worse than native vertical. Frame everything for 1080×1920 from the start. Keep subjects centered (most platforms crop the edges), and keep text within the safe zone — away from the top 15% (username overlay) and bottom 15% (caption/CTA area).
For exact specs by platform, see our YouTube Shorts dimensions guide and Instagram Reels length guide.
| Platform | Resolution | Aspect Ratio | Max Length |
|---|---|---|---|
| YouTube Shorts | 1080×1920 | 9:16 | 3 minutes |
| TikTok | 1080×1920 | 9:16 | 10 minutes |
| Instagram Reels | 1080×1920 | 9:16 | 3 minutes |
| YouTube (long-form) | 1920×1080 or 3840×2160 | 16:9 | 12 hours |
6. Cut Dead Air Ruthlessly
Every pause, "um," and moment of hesitation is a swipe trigger. In short form video editing, if a silence lasts longer than 0.3 seconds, cut it. Jump cuts between sentences are expected and even preferred on TikTok and Shorts — they signal fast pacing and respect for the viewer's time.
7. Use Jump Cuts to Control Pacing
Jump cuts (cutting mid-sentence to remove a pause, then continuing) are the standard editing language of short-form. They keep energy high and content dense. A 60-second Short with good jump cuts contains as much information as a 3-minute video with natural pauses.
For talking-head content: cut every pause, every restart, every filler word. The result should feel like a continuous, energetic monologue.
8. End With a Loop or CTA
The last 2-3 seconds determine what happens next. Two approaches work:
- The loop: End with a visual or audio cue that connects back to the opening frame. Viewers replay the video (the algorithm counts replays as strong engagement).
- The CTA: "Follow for more," "Try this yourself," or "Link in bio." Direct, one action, no ambiguity.
Don't let a video just... end. The final frame should always push the viewer toward an action — replaying, following, commenting, or clicking.
9. Match Transitions to the Beat
If your video has background music, every cut and transition should land on a beat. This creates a subconscious rhythm that makes editing feel polished. Even if viewers can't articulate why the video feels "professional," beat-matched editing is usually the reason.
Most NLEs let you add audio markers on beat drops. Place your cuts on those markers.
10. Test Different Thumbnail Frames
On YouTube Shorts and Instagram Reels, the thumbnail/cover frame matters more than on TikTok. YouTube auto-selects a frame; Instagram lets you choose a cover photo. Pick a frame with expressive visuals, readable text, and high contrast. A/B test by uploading the same content with different covers and comparing click-through rates over a week.
Beginner Video Editing Tips (Tips 11–20)
If you're learning how to edit videos for the first time, these fundamentals matter more than any fancy effect.
11. Start With Cuts, Not Effects
New editors reach for transitions, color effects, and filters before mastering the basics. The most important skill in editing is knowing where to cut. A well-paced video with hard cuts looks more professional than a poorly timed video drowning in star wipes. Master cutting first. Everything else is decoration.
12. Learn Your Editor's Keyboard Shortcuts
The difference between a 3-hour edit and a 30-minute edit is often just keyboard shortcuts. Memorize these for your editor of choice:
- Cut/Split clip — Ctrl/Cmd + K (most editors)
- Ripple delete — removes clip and closes the gap
- Play/Pause — Spacebar
- Zoom timeline — + and - keys
- Mark In/Out points — I and O keys
- Undo — Ctrl/Cmd + Z (your best friend)
13. Use J-K-L Keys for Playback Control
J plays backward, K pauses, L plays forward. Pressing L or J multiple times increases playback speed. This lets you scrub through footage at 2x, 4x, or 8x speed to find the exact frame you need — far faster than dragging the playhead manually.
14. Color Correct Before Color Grading
Color correction fixes problems: exposure, white balance, contrast. Color grading adds style: warm tones, desaturated looks, orange-and-teal cinema. Always correct first. Applying a cinematic LUT to footage with the wrong white balance produces muddy, inconsistent results.
A simple correction workflow: (1) fix white balance, (2) set exposure so highlights aren't blown, (3) adjust contrast, (4) then apply a subtle grade.
15. Export at the Right Resolution and Bitrate
Uploading a 720p file to a platform expecting 1080p looks soft. Uploading at unnecessarily high bitrate wastes upload time without visible quality gain. Safe defaults for most platforms:
Create Faceless Videos on Autopilot
FlowShorts generates and posts AI videos to YouTube, TikTok & Instagram while you sleep.
Try FlowShorts Free →- Short-form (Shorts, Reels, TikTok): 1080×1920, H.264, 10-15 Mbps, 30fps
- Long-form YouTube: 1920×1080, H.264, 15-25 Mbps, 24 or 30fps
- 4K YouTube: 3840×2160, H.265 if supported, 35-50 Mbps
Our video length calculator helps you figure out the right duration and file size before exporting.
16. Save Project Files Frequently
Not the exported video — the project file. Use version naming: project_v1.proj, project_v2.proj. When a client wants a revision three weeks later, you need the editable project, not just the final MP4. Enable auto-save if your editor supports it.
17. Organize Footage Into Bins and Folders
Before you place a single clip on the timeline, sort raw footage into labeled bins: "A-Roll," "B-Roll," "Audio," "Graphics," "Music." Editors who skip this step spend 40% of their editing time searching for files instead of editing. Organization compounds — the time you invest up front saves multiples later.
18. Use Adjustment Layers for Global Changes
Need to apply the same color grade, filter, or effect to your entire timeline? Don't apply it clip by clip. Create an adjustment layer above all clips and apply the effect once. Changes to the adjustment layer affect everything below it. This is faster and makes it easy to toggle effects on and off.
19. Learn the Rule of Thirds for Framing
Divide the frame into a 3×3 grid. Place your subject's eyes or the key visual element along the grid lines or intersections — not dead center. This applies to both filming and editing. When reframing footage in post (cropping, repositioning), use the rule of thirds to guide your crop.
20. Watch Your Audio Levels
Inconsistent audio is the fastest way to lose a viewer. Use these target levels:
| Audio Element | Target Level |
|---|---|
| Dialogue / Voiceover | -6 to -12 dB |
| Background Music | -18 to -24 dB |
| Sound Effects | -12 to -18 dB |
If viewers have to adjust their volume while watching, you've lost them. Use your editor's audio normalization tool or a compressor to keep levels consistent.
Audio and Music Editing Tips (Tips 21–28)
Bad audio kills videos faster than bad visuals. Viewers will tolerate grainy footage with clear audio, but not sharp 4K with muffled, echoing sound.
21. Always Record Room Tone
Before filming, record 30 seconds of silence in the room. This "room tone" captures the ambient sound of your recording space. When you need to fill gaps between sentences or smooth transitions, room tone sounds natural. Actual silence (0 dB) creates jarring dead spots the listener can feel.
22. Use Royalty-Free Music Libraries
Using copyrighted music gets your video muted or demonetized. Use libraries like Epidemic Sound, Artlist, or YouTube's Audio Library (free). Match the energy of the music to your content — don't use epic cinematic scores behind a quiet tutorial.
23. Match Music Energy to Content
Background music is a pacing tool, not decoration. Upbeat tracks increase perceived energy. Lo-fi and ambient tracks create focus. Dramatic beats signal importance. When the content shifts — from explanation to demonstration, from setup to reveal — the music should shift too.
24. Fade Audio In and Out at Cuts
Hard audio cuts (music or dialogue cutting off abruptly) sound jarring. Apply a short crossfade (50-100ms) at every audio edit point. Most editors do this automatically with "audio transitions." If yours doesn't, manually add 3-5 frame fades at each cut. Small detail, big difference.
25. Remove Background Noise First
Before any other audio work, run noise removal on your dialogue tracks. Tools like Adobe Podcast AI, Descript, or even Audacity's free noise reduction can eliminate hum, hiss, fan noise, and room echo. Clean audio is the foundation — everything else (music, SFX, compression) builds on top of it.
26. Sync Cuts to the Beat
This applies to both long-form and short-form. When background music is playing, place your visual cuts on the beat. Not every beat — pick the major ones (downbeats, drops, transitions). Beat-synced editing creates rhythm that feels intentional and polished. It's the difference between "someone cut this together" and "someone edited this."
27. Use Sound Effects for Emphasis
A subtle whoosh on a transition. A pop when text appears. A click on a cut. Sound effects give your edits weight. They signal to the viewer that something changed, and make pacing feel deliberate. But subtlety is key — if the viewer consciously notices the SFX, it's too loud. Vary your effects too; the same whoosh on every cut gets old fast.
28. Keep Dialogue 6 dB Above Music
If background music and dialogue compete for attention, dialogue always loses clarity. The simple rule: your voiceover or dialogue track should sit at least 6 dB above the music bed. Use sidechain compression or just automate the music volume down during speaking segments. The music is there to support the voice, not compete with it.
Our speech time calculator helps you plan narration length to match your target video duration before you ever hit record.
Pro Video Editing Tips (Tips 29–36)
These techniques separate competent editors from editors whose work people actually notice.
29. Use Proxies for 4K and Higher
Editing native 4K (or 6K/8K) footage on a mid-range machine is painfully slow. Create proxy files — lower-resolution copies — to edit smoothly, then relink to the original high-res files for export. Every major NLE (Premiere Pro, DaVinci Resolve, Final Cut Pro) has built-in proxy workflows. This costs 10 minutes of setup and saves hours of frustration.
30. Use LUTs as Starting Points, Not Finished Grades
LUTs (Look-Up Tables) apply pre-made color grades to your footage. They're useful starting points, but never apply a LUT and call it done. Every clip has different exposure, contrast, and color temperature. Apply the LUT, then adjust intensity (usually dial it back to 60-80%), tweak exposure, and fine-tune to match your specific footage.
31. Master Speed Ramping
Speed ramping — smoothly transitioning between normal speed and slow motion (or fast motion) — adds cinematic flair to transitions and action sequences. Use it for: entering a scene (fast to normal), emphasizing a moment (normal to slow), or transitioning between shots (slow to fast). The key is smooth acceleration curves, not abrupt speed changes.
32. Use Masking for Creative Transitions
Draw a mask around a subject and use it to transition between scenes. Example: a person walks past the camera, and a mask wipe follows their movement to reveal the next scene behind them. Masking transitions feel organic because they use elements already in the frame. They take practice but produce results no preset transition can match.
33. Nest Sequences for Complex Edits
When a section of your timeline gets complicated (layered effects, multiple audio tracks, compositing), nest it into a sub-sequence. This collapses the complexity into a single clip on your main timeline. You can still double-click to edit the nest. This keeps your main timeline clean and your editor responsive.
34. Use Motion Graphics Templates
Lower thirds, title cards, subscribe buttons, callout boxes — don't build these from scratch for every video. Create or download motion graphics templates (MOGRTs in Premiere, Fusion compositions in Resolve) and reuse them. Consistent graphics across videos build brand recognition and save hours per project.
35. Export in Multiple Formats
Create Faceless Videos on Autopilot
FlowShorts generates and posts AI videos to YouTube, TikTok & Instagram while you sleep.
Try FlowShorts Free →One video, multiple destinations. Export a 16:9 version for YouTube long-form, a 9:16 version for Shorts/Reels/TikTok, and a 1:1 version for Instagram feed or LinkedIn. Use your editor's auto-reframe feature or create separate sequences for each aspect ratio. Repurposing one edit across platforms multiplies your content without multiplying your editing time.
36. Create Reusable Presets for Everything
Color grades, audio processing chains, text styles, transition timings, export settings — if you do it more than twice, save it as a preset. Starting from a blank timeline is an amateur move. Starting from a template with your presets already loaded cuts editing time by 40-60%.
AI-Powered Video Editing Tips (Tips 37–43)
In 2026, manually editing every video from scratch is a choice, not a requirement. AI handles the most repetitive and time-consuming parts of video production — and it's getting better every month.
37. Use AI for Script Generation
Writer's block is no longer an excuse. AI script generators take a topic or a few bullet points and produce a structured, narration-ready script in seconds. This is particularly powerful for faceless YouTube channels where the script is the content. Start with AI output, then edit for your voice and accuracy.
Try our free AI video script generator — it creates scripts formatted for short-form video with scene breakdowns and narration text.
38. Auto-Generate Captions With AI
Manual captioning a 60-second video takes 15-20 minutes. AI captioning tools (CapCut, Descript, Premiere Pro's auto-transcribe) do it in under 30 seconds with 95%+ accuracy. For word-by-word animated captions (the TikTok style that drives the highest engagement), AI is the only practical option — doing it manually would take hours per video.
39. Let AI Handle Image and B-Roll Selection
Finding, licensing, and placing B-roll footage for every scene is one of the biggest time sinks in editing. AI tools can now match your script to relevant stock imagery or generate custom images from text prompts. For faceless content, this eliminates the most tedious part of the workflow entirely.
40. Use AI Voiceover for Faceless Content
Text-to-speech has crossed the uncanny valley. Modern AI voices from ElevenLabs, OpenAI, and others are nearly indistinguishable from human narration. For faceless channels where you don't want to record your own voice, AI voiceover eliminates the recording, re-recording, and noise cleanup cycle. Generate, review, use.
41. Automate Posting With Scheduling Tools
Editing is only half the work. Formatting, uploading, writing titles, adding hashtags, scheduling, and posting to 2-3 platforms per video eats another 20-30 minutes. Automating the posting pipeline — YouTube Shorts automation, TikTok automation, Instagram Reels auto-posting — reclaims that time for every single video.
42. Use AI to Repurpose Long-Form Into Shorts
If you create long-form content (podcasts, tutorials, webinars), AI can identify the best 30-60 second clips, reframe them vertically, add captions, and export them as Shorts-ready clips. One 30-minute video can yield 5-10 short-form clips without any manual editing. Tools in the AI video generator space are built specifically for this workflow.
43. Skip Editing Entirely — Let AI Handle the Full Pipeline
Here's the tip most editing guides won't give you: for faceless short-form content, you don't need to edit at all.
FlowShorts handles the complete video production pipeline — script generation, AI voiceover, image creation, animated captions, transitions, background music, and rendering — then auto-posts the finished video to YouTube Shorts, TikTok, and Instagram Reels on your schedule. You pick a niche and a posting frequency. The system produces and publishes daily.
This isn't about replacing creative editing. It's about recognizing that many creators spend 80% of their time on repetitive production tasks and 20% on creative decisions. Automating the 80% lets you focus on strategy, audience, and growth — or simply reclaim your time.
Best Free Video Editing Software (2026)
You don't need expensive software to apply these tips. Here are the best free editors by use case:
| Software | Best For | Platform | Standout Feature |
|---|---|---|---|
| CapCut | Short-form (TikTok, Reels, Shorts) | Desktop + Mobile | Auto captions, trending templates |
| DaVinci Resolve | Professional editing + color grading | Desktop | Industry-standard color tools, free tier |
| Descript | Podcast and talking-head video | Desktop | Edit video by editing a text transcript |
| Canva Video | Simple social media videos | Browser | Drag-and-drop, brand templates |
| iMovie | Mac/iOS beginners | Apple only | Simple, intuitive, free on Apple devices |
| FlowShorts | Faceless short-form on autopilot | Web app | Full pipeline: script → video → auto-post |
For a detailed comparison of AI-powered options, see our alternatives and comparison page.
Tools to Level Up Your Editing
These free tools complement your editing workflow:
- AI Video Script Generator — Generate narration-ready scripts from a topic
- Video Hook Generator — Create scroll-stopping opening lines
- Video Length Calculator — Plan video duration and file size
- Speech Time Calculator — Match narration length to target duration
- YouTube Title Generator — Create click-worthy titles for your videos
- YouTube Description Generator — Write SEO-optimized video descriptions
- YouTube Shorts Ideas Generator — Get video ideas for any niche
- TikTok Hashtag Generator — Find the right hashtags for reach
Video Editing Tips by Platform
YouTube Shorts Editing Tips
- Keep Shorts under 60 seconds for maximum algorithmic push on the Shorts shelf
- Add a subscribe CTA in the last 3 seconds — Shorts viewers convert to subscribers at high rates
- Loop your ending back to the beginning for higher replay rates
- Use native vertical framing (9:16) exclusively — never crop horizontal footage
Need ideas? Try our YouTube Shorts ideas generator or explore Shorts ideas by niche.
TikTok Editing Tips
- Use trending sounds even as background audio — TikTok's algorithm boosts videos using trending audio
- Add text hooks in the first frame that create curiosity
- For the TikTok Creator Rewards Program, videos must be 1+ minute long — aim for 60-90 seconds
- Use TikTok's native effects and green screen — the algorithm may favor content using platform features
Instagram Reels Editing Tips
- Instagram favors polished, high-quality visuals — color grading matters more here than on TikTok
- Use cover images that look good in your profile grid. Unlike TikTok, Reel thumbnails show on your profile
- 3-5 relevant hashtags outperform 30 generic ones, according to Hootsuite's hashtag research
- Reels under 30 seconds tend to loop more, increasing total watch time
Common Video Editing Mistakes
- Over-editing: Transitions, zooms, and effects on every cut. Less is almost always more.
- Inconsistent audio levels: Dialogue at -6 dB in one clip, -18 dB in the next. Normalize everything.
- Ignoring mobile preview: Text that's readable on a 27" monitor may be invisible on a phone. Always preview on mobile before publishing.
- Using too many fonts: Two fonts maximum per video. One for headings, one for body.
- Slow intros: Any video that takes more than 2 seconds to deliver value will lose most viewers on short-form platforms.
- No captions: You're invisible to the 85% watching on mute.
- Wrong export resolution: 1080p horizontal uploaded to a vertical platform, or 720p to a 1080p feed.
Frequently Asked Questions
What is the most important video editing tip for beginners?
Cut ruthlessly. The single most impactful thing a beginner can do is remove dead air, pauses, and filler words. Tight pacing keeps viewers watching, and watch time is the primary metric every platform's algorithm uses to decide whether to promote your video.
How long should a short-form video be?
For maximum reach: 30-60 seconds for YouTube Shorts and Instagram Reels, 60-90 seconds for TikTok (especially if you want to earn from the Creator Rewards Program, which requires 1-minute minimum). The ideal length varies by niche — test different durations and check your analytics.
What video editing software do most YouTubers use?
The most common choices in 2026: Adobe Premiere Pro (industry standard, paid), Final Cut Pro (popular with Mac users), DaVinci Resolve (best free professional editor), and CapCut (most popular for short-form). For faceless automated content, AI tools like FlowShorts handle editing automatically.
How can I make my videos look more professional?
Three changes make the biggest difference: (1) consistent color grading across all clips, (2) clean, normalized audio with no background noise, and (3) tight pacing with no dead air. These three improvements alone make any video look significantly more polished, regardless of camera quality.
How often should I change the visual in a short-form video?
Every 2-3 seconds. This doesn't mean chaotic cutting — any visual change counts: a new angle, a zoom, text appearing, B-roll, or a graphic. Static shots longer than 3 seconds lose attention on short-form platforms. The goal is intentional visual variety, not random motion.
What frame rate should I use?
30fps is the standard for social media content. 24fps gives a cinematic look for long-form narrative content. 60fps suits fast-motion content (sports, gaming, action). For short-form vertical video, 30fps at 1080×1920 is the safe default across all platforms.
Is AI video editing good enough to replace manual editing?
For faceless short-form content (motivation, education, news, niche compilations), AI handles the full pipeline reliably — scripts, voiceover, visuals, captions, and posting. For brand-specific content requiring a unique creative voice, AI is best used to speed up individual tasks (captioning, noise removal, rough cuts) while humans make the creative decisions. The line is moving fast — what required manual editing last year is often fully automatable today.
Related Guides
- YouTube Shorts Dimensions and Specs Guide
- Instagram Reels Length Limit Guide
- TikTok Creativity Program Guide
- Best AI Video Generators of 2026
- How to Make Videos Go Viral
Skip the Editing — Generate Videos on Autopilot
FlowShorts handles the entire video production pipeline for faceless short-form content: AI scripts, voiceover, visuals, animated captions, transitions, music, and auto-posting to YouTube Shorts, TikTok, and Instagram Reels. Pick a niche and a schedule — the system does the rest.
Related: Complete Short-Form Video Editing Workflow